Introduction
Jile is a simple yet comprehensive platform for managing the end to end software delivery value stream. Jile provides the ability to configure the product based on specific team or organizational needs. This guide will describe the various features available for teams to setup and configure the product.
As an administrator you need to understand certain core aspects of Jile which will help you to manage and administer the product effectively
Subscription / Account
A Subscription or an account is an active contract between a customer and Jile. Any organization or team who wishes to use Jile must subscribe to its services. Jile provides a free trial subscription valid for 1 month. During the trial period or at the end of trial period the trial subscription can be converted to a paid subscription by paying appropriate fees.
Tenant / Domain
When an organization registers for a subscription (trial or paid) a tenant or domain gets created in Jile. Each tenant has a unique URL in the form of https://<tenant_id>.jile.io. Each tenants data is logically separated from one another and cannot be accessed from other tenants
Workspace / work-areas
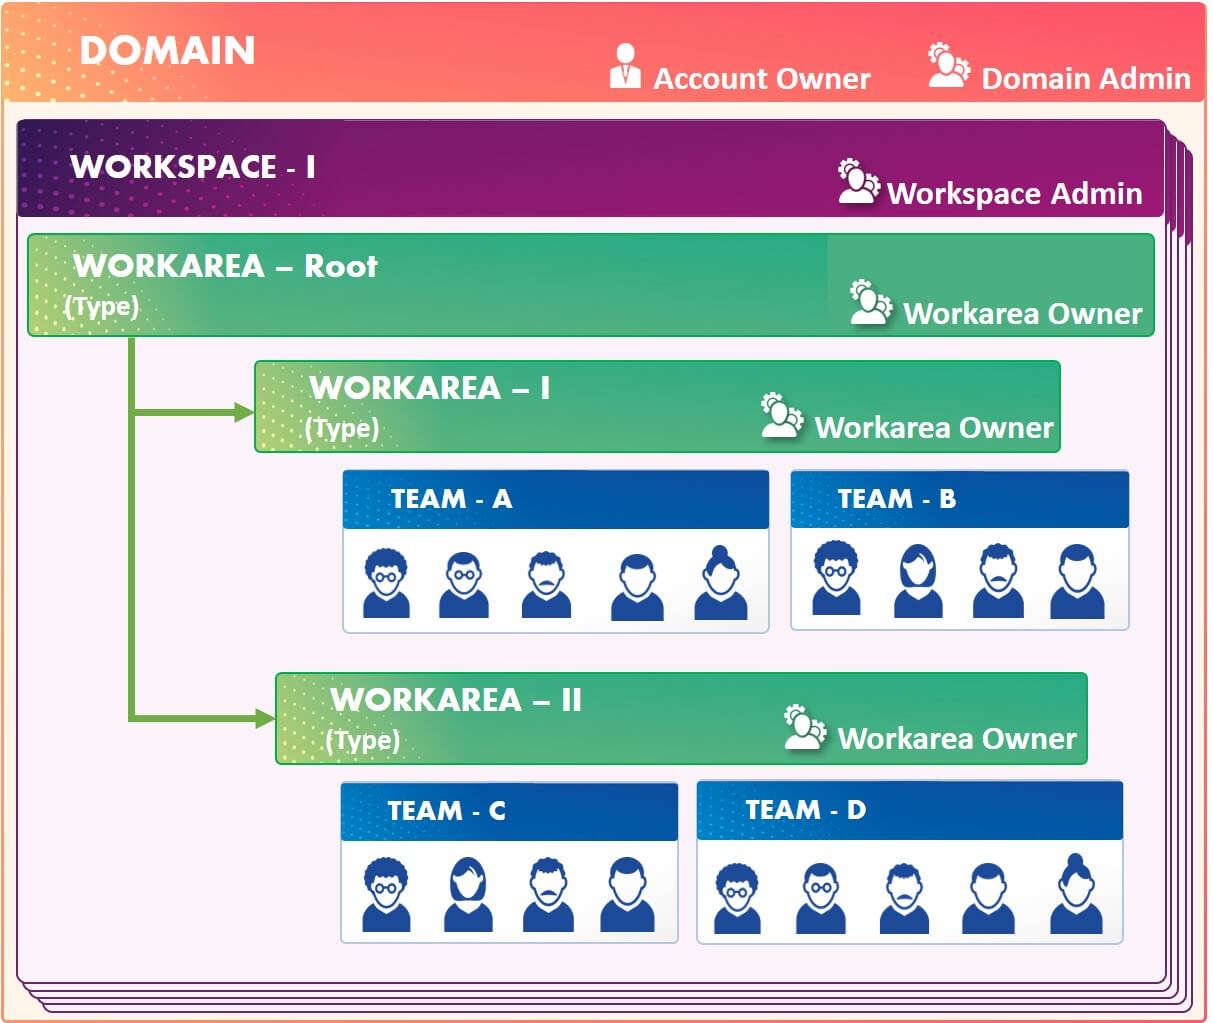
A workspace is a logical container for teams to manage product development and delivery processes. A tenant or domain can have multiple workspaces. This helps the organizations to manage multiple product development activities within the same tenant or domain. A workspace contains a set of hierarchical work-areas with one root work-area. Each work-area has a type and a owner.
E.g. A workspace with 'Portfolio with multiple programs' way of working will have a root work area type called portfolio and a set of child work-area types called programs. A workspace with 'Scrum' way of working will have a root work-area type called product.
-
Workspace has the following characteristics
A workspace will follow the single way of working All settings are defined globally at a workspace level All data aggregation and roll-ups are possible only within a workspace Data and artifacts cannot be shared across workspaces A User can be mapped to one or more workspaces
There are 2 different models by which you can manage multiple product development and delivery processes within Jile. In the first model you can create a dedicated workspace for each product E.g. Organizations which are managing multiple independent product can create one workspace for each product they are managing in Jile
In the second model you can create a child work-area in an existing workspace (provided your workspace way of working is configured to have child work-areas). E.g. Organizations managing multiple sub products under the same portfolio or you have one large product with multiple child products etc.
There following are the pros and cons of the two models.
| Multiple individual workspaces | Single workspace with child work-areas | ||
|---|---|---|---|
| Pros | Cons | Pros | Cons |
| Independent ways of working for each workspace | No roll-ups or aggregation possible across workspaces | Data aggregation and roll-ups possible | Single way of working for all teams |
| Settings can be customized for each workspace | No common settings or administration | One global settings | Settings cannot be customized at work-area level |
| Cannot do synchronized planning | Supports synchronized planning | ||
| Cannot share artifacts | Artifacts can be shared | ||
Account Management
An account owner is the person who has subscribed for an account in Jile. He or she can manage the subscription details by navigating to the My Accounts page. The account owner has following privileges.
Domain Administration
A Domain Admin is a super user who has the full access rights to manage the tenant or domain and all its workspaces. When a person subscribes for an account in Jile he or she will automatically be tagged as a domain admin
Domain Settings
| Attribute | DESCRIPTION |
| Account Owner | The user who has subscribed for an account in Jile |
| Tenant Name | System generated tenant id for the subscription |
| Organization Name | Name of your organization or company |
| Tagline | Tagline of your organization or company |
| Currency | The default currency |
| Email Domains | List of authorized email domains. This setting is used to limit user addition from selected email domains. E.g. company.com will allow user addition with email ids as xxx@company.com only. |
| Domain Admin | List of domain administrators. As a domain admin you can tag additional users as domain admins |
Users
Domain admin can manage the set of users in a domain or tenant. An user can be tagged to one or more workspaces within the domain or tenant.
Any user added to the domain will consume one active license
User Access Control
Domain admin can configure the access control for user management. Based on this configuration, the user management access shall be provided to only workspace/domain admnistrators or everyone. User management access provides permission to add/remove users to the domain, update user roles, tag a user to a workarea or a team, remove a user from a workarea or a team.
| Configuration | DESCRIPTION |
| Domain Admin | This configuration allows Domain admin to control the user management access only to the users with domain administrator role. |
| Domain Admin and workspace admin | This configuration allows Domain admin to control the user management access only to the users with domain admin and workspace admin roles. In this configuration, workspace admin can perform user management actions within the workspace. |
| Everyone | This is the current default configuration where any one in the team can access user management. |
Workspace
One of the primary responsibility of the domain admin is to manage the set of workspaces within the tenant. Each workspace is a logical container for teams to manage product development and delivery processes. Refer to the getting started guide to understand how to create a workspace and the associated work-areas.
Other Settings
In addition to these settings the domain admin has the privileges to manage the set of locations where the teams operate from and define custom fields for users and track the license usage.
Workspace Administration
A workspace admin is a user who has privileges to manage a specific workspace. When a workspace is created the owner of the root work area (E.g. Product Owner / Portfolio Owner etc.) is automatically tagged as the default workspace admin.
Workspace Settings
| Attribute | DESCRIPTION |
| URL Name | The unique url name used to access this work-space. Jile will automatically create a url name for each workspace. This can be updated by the workspace admin. |
| Name | Name of the workspace |
| Time frame | Default business time frame E.g Quarter , Year etc. |
| Default Story Estimate | Default value for story estimate in points. |
| Default Test Suite Estimate | Default value for test suite estimate in points. |
| Workspace Admins | List of workspace administrators. As a workspace admin you can tag additional users as workspace admins |
Users
Workspace admin can manage the set of users in a workspace. Any user who is part of the domain / tenant can be tagged to workspace or a new user can be created at the workspace level. Any new user added to the workspace will be added to the domain user list automatically.
A user can be tagged to multiple workspaces at any point in time. However they will be considered as one licensed user in Jile.
Roles
The workspace admin can manage a list of roles for each work-area type defined as part of the way of working in addition to the roles at the team level. At the team level roles can be defined for scrum and kanban teams independently.
Work Calendar
The work calendar defines the working days in a week along with the working hours per day. In addition specific holidays can also be defined. The work calendar is used to calculate the team capacity in person hours during iteration planning.
Additionally during iteration planning individual team members can update their available work hours for each day in the iteration schedule.
Ways of working
A way of working defines the specific working model each product or team chooses to use. To know more please refer to the ways of working guide.
When a workspace is created the configurations of the selected wow gets pre-populated in the way of working settings. The workspace admin can subsequently override and modify the wow settings. Any changes done to the wow settings will be specific to the workspace.
Planning Models
Agile and Lean methods are based on incremental development and delivery. Increments can either be planned and delivered in time-boxes or continuously. Time-boxes are fixed time schedules where a limited set of work is planned to be delivered by the end of the time-box. Continuous flow is where the work is planned in a continuous fashion based on the available capacity defined in the form of work in process limits.
Frameworks like Scrum and XP are based on time-box models. Kanban is a lean agile tool that supports a flow model
Modules
Modules are capabilities of Jile that support the end to end solution development and delivery processes. E.g. Vision, Stories, Iterations, Tests, Pipeline etc. Jile provides a set of Functions that realize each module. A Function is an implementation of a specific agile practice or process related to each module or capability. E.g. an iteration module can have Functions like iteration planning, iteration progress, iteration backlog etc.
Work-Area Types or Levels
Work areas is a logical space where teams manage the development and delivery processes and artifacts. Work-area types helps you to define different types work areas and its hierarchy levels. Each work-area type can have its own set of functions depending on the kind of work that gets executed at that level. Eg of work-area types could be portfolio, program, project etc.
An execution layer work area type is where the core development activity takes place and can have one or more agile teams tagged to it. A non-execution level work area types are usually used to govern and manage a set of execution level work-areas. E.g. A portfolio work area may contain multiple product level work areas
Parent work-areas can aggregate and roll-up data across all its child work areas. A parent work-area can plan and track work for all its child work-areas as well. If a work-area has multiple teams tagged then each team will have its own work area with a type called TEAM
Plannable Entities
Plannable Entity refers to the backlog item type that can be planned into a specific time-box. Jile provides 3 levels of Backlog item types namely Capabilities, Features and Stories.
When a backlog item is defined as a plannable entity then it cannot be marked as Done without planning them into the specific time-box. All its child backlog items should also planned and delivered in the same time-box. If a backlog item is not a plannable entity then it behaves as a pure container for its child backlog items and cannot be planned into any time-boxes. However its child backlog items can be planned and delivered across one or more time-boxes.
Terminologies
Terminologies defines alternate labels for different entities in Jile. This helps to customize or define your specific vocabulary to suit your organizational needs.
Entity Access Control
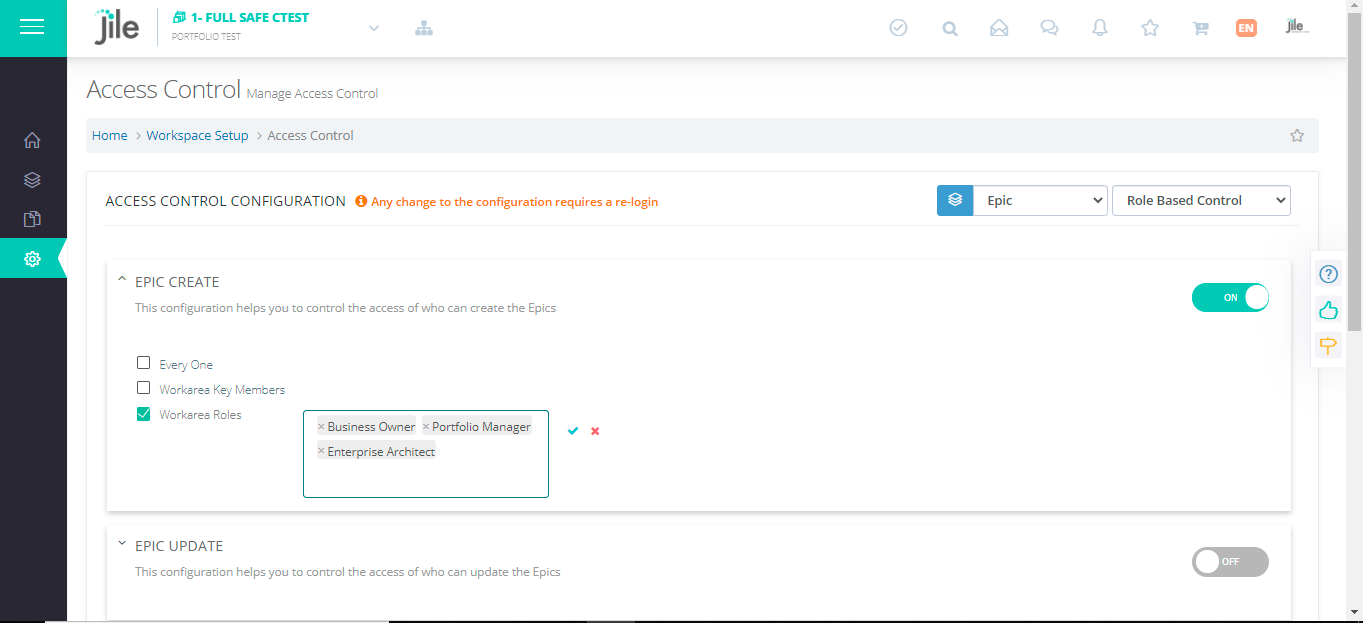
Jile provides additional configuration for workspace admin to control access of Portfolio entities (Vision, Objective, Initiative, Capability, Persona, Components, Constraints), Product entities (Feature, Defect, Release, Iteration) and other entities (Pipeline, Workarea, Team, Menu). It currently supports access control for basic actions (Create, Update, Delete ) and attachments Upload, Dowload, Delete.
Access control for additional categories and events are in the product roadmap. Feedback and suggestions can be provided from the application home page.
Role Based Configuration
- "Everyone" provides access to any authorized users of the Workarea (including work area key members and team members) to perform this action. "Key Member" provides access to any authorized users of the Workarea with Key member roles to perform this action "Workarea Roles" provides access to any authorized users of the workarea with the selected roles to perform this action "Team Roles" provides access to any authorized users of the team with the selected roles to perform this action
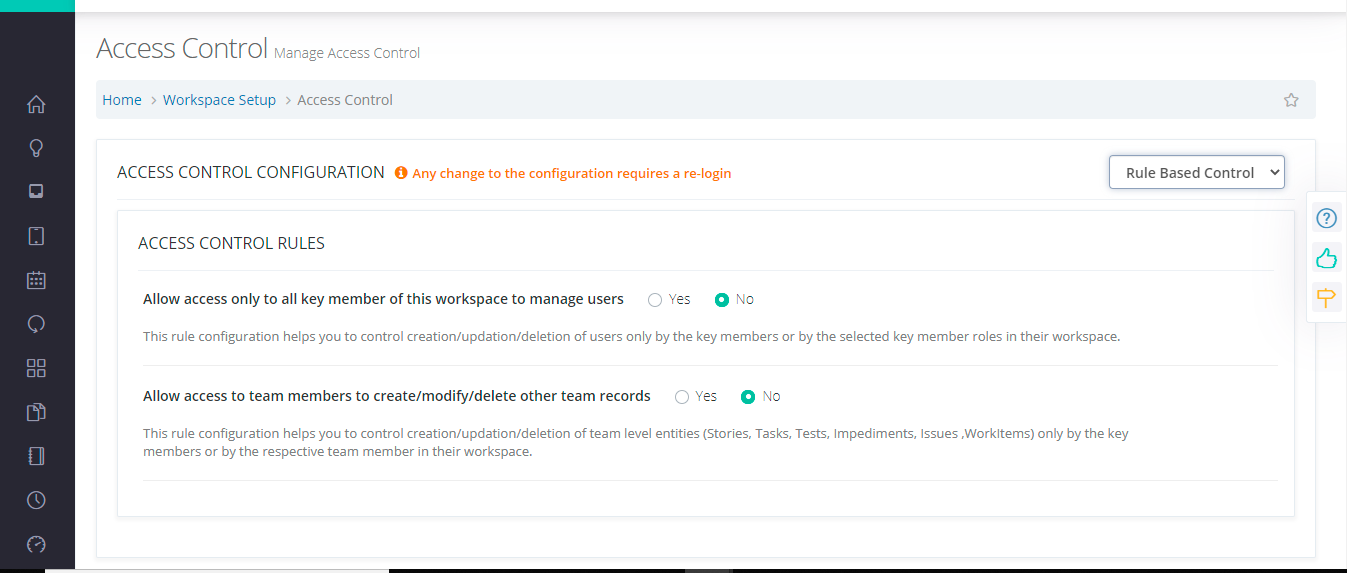
Rule Based Configuration
| Yes | Team Member can create/modify/delete other team records at product level and team level |
| No | Workarea key member and respective team members only can create/modify/delete team records |
| Yes | WorkArea keymember alone can manage users for their workspace |
| No | Domain level user management will control the users of their workspace |
Status
All key entities in Jile have a default attribute called the status. The status field is used for tracking the life-cycle of an entity. All entities begin their life-cycle in the start state and are marked completed when moved to the done state

In addition backlog items like initiatives, capabilities, features and stories have a special state called ready state.
The stages from start to ready are generally used for tracking the funneling and grooming process. Once the backlog items are sufficiently groomed they are moved to the ready state awaiting implementation
Backlog items in the ready state are picked for implementaton based on the priority and marked as done when completed
Backlog items in the done state are moved to the done pile automatically when the release or iteration timebox are completed or can be moved manually.
Tests have default statuses which cannot be modified or deleted. However additional status can be added.
Custom Fields
Jile provides a set of pre-defined meta data for each entity like user, initiatives, feature, story, test etc. In addition to these teams can configure up to 60 additional attributes for each entity.
In the left panel you could add fields which provide additional descriptions about the entities. In the right panel you could add fields which helps you to classify the entities.
Initial Estimate
Initial estimate defines a rough order of estimate of a backlog item. Initial estimates are usually defined before the backlog items are groomed and subsequently broken down into child items and detailed estimates are defined.
Initial estimates are defined for backlog items like Initiatives, Capabilities and Features. Initial estimate can be a numeric field or a list of pre-defined values. E.g Small, Medium, Large or T-Shirt sizes like S,L, XL,XXL etc.
In addition initial estimates can also be calculated automatically based on a set of parameters defined. Each parameter has a label, a min and max value and a weightage associated with it. Based on the selected value for each parameter jile will calculate the initial estimate automatically.
For a 1 dimensional calculator jile will calculate the initial estimate using the following formula
Initial Estimate = Σ (parameter value x weightage) / Σ weightage
For a 2 dimensional calculator jile will calculate the initial estimate using the following formula
Initial Estimate = Σ Sum of Dimension 1 (parameter value x weightage) / Σ weightage divided by Σ Sum of Dimension 2 (parameter value x weightage) / Σ weightage
Business Value
Business value defines the potential value delivered by the backlog item. Traditional approaches uses parameters like ROI, IRR or NPV to calculate the business value. Agile methods uses a relative scoring using business value points etc. Business value can be a numeric field or a list of per-defined values.
In addition business value can also be calculated automatically based on a set of parameters defined. Each parameter has a label, a min and max value and a weightage associated with it. Based on the selected value for each parameter jile will calculate the business value automatically.
For a 1 dimensional calculator Jile will calculate the initial estimate using the following formula
Business Value = Σ ( parameter value x weightage ) / Σ weightage
For a 2 dimensional calculator Jile will calculate the initial estimate using the following formula
Business Value = Σ Sum of Dimension 1 ( parameter value x weightage ) / Σ weightage divided by Σ Sum of Dimension 2 ( parameter value x weightage ) / Σ weightage
Policy and Wait Flag
Teams which follow Kanban way of working can define policies and wait flag for each of their workflow status. This can be defined globally at the workspace level or at individual team / board level.
Other Settings
In addition to the above configurations the workspace admin can manage attributes like business time frame, defect and issue severity, test suite types, test case category etc.